


When you’re facing online gaming issues due to a restrictive NAT (Type 3), one effective solution is to use a VPN that provides a public IPv4 address. While Shellfire Box VPN router solution is the easiest way to achieve NAT type 2 (moderate) on your console, this guide will show you how to achieve the same thing by configuring your PC to act as a VPN relay. This method routes your console’s traffic through your PC’s VPN connection, bypassing ISP limitations (like DS-Lite or Carrier Grade NAT) that normally force you into a strict NAT environment.
In this article, you will learn:
- Why NAT type matters for online gaming
- The benefits of using a Shellfire VPN connection to improve NAT type
- How to configure your PC (using Windows) to share its VPN connection with your gaming console
- Troubleshooting tips for common issues
Understanding NAT Types in Gaming
Home networks typically use a sytem called Network Address Translation (NAT). There are three primary types:
- NAT Type 1 (Open): The device is directly connected to the Internet. Although ideal for connectivity, it is rarely achievable at home—and it compromises security.
- NAT Type 2 (Moderate): Most home networks (using a router) end up here. It allows nearly all game functions to work properly while maintaining some firewall protection.
- NAT Type 3 (Strict/Restricted): A restrictive setup that limits incoming connections, often resulting in problems with multiplayer gaming, party chats, and game invites.
ISPs that use technologies like DS-Lite or Carrier Grade NAT typically force gaming consoles into a NAT Type 3 environment. By connecting through a VPN (like Shellfire VPN), your PC can “borrow” a true public IPv4 address—helping your console to achieve NAT Type 2.
What You’ll Need
Before you begin, make sure you have:
- A PC (Windows 11 is used in this guide, Windows 10 should work the same way): This will act as the VPN relay.
- Shellfire VPN Subscription and the Shellfire VPN App: Install and log in to the Shellfire VPN app on your PC.
- Active Internet Connection: The PC must have a working broadband connection.
- Gaming Console (PlayStation, Xbox, or Nintendo): The device that is currently stuck with NAT Type 3.
- Network Connection Options:
- Wired Option: An Ethernet cable to connect your console directly to the PC.
- Wireless Option: A Wi-Fi adapter to create a mobile hotspot on your PC. Note: If your PC is connected to the internet via Wi-Fi, you will need a second Wi-Fi adapter if you want to connect your console wirelessly. That could be a USB Wi-Fi dongle for example. A wired connection is recommended for ease of setup, best stability and performance.
- Basic Administrative Access: Ability to change network settings (for example, using Windows Internet Connection Sharing).
Step-by-Step Setup
1. Connect Your PC to the Internet and VPN
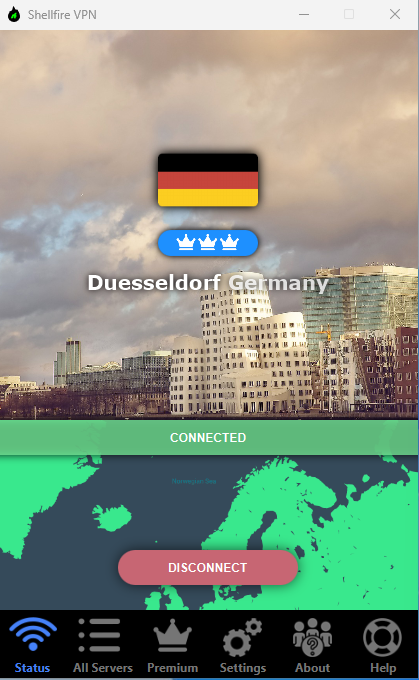
- Launch Shellfire VPN: Open the Shellfire VPN client on your PC and connect to a server. For the best gaming experience, select a server that is geographically nearby. Make sure "Wireguard" is selected in the Shellfire VPN Options. OpenVPN will also work but will offer slightly lower performance for gaming. The VPN will automatically assign your PC a public IPv4 address, which is key to bypassing NAT restrictions.
2. Enable Internet Connection Sharing (ICS) on Your PC
To share your VPN connection with your gaming console, you need to use Windows’ Internet Connection Sharing:
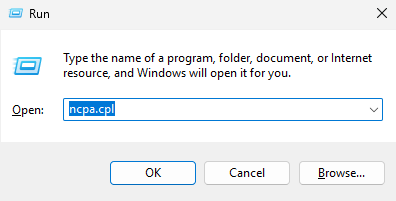
- Open Network Settings:
- Press Windows + R, type
ncpa.cpl, and hit Enter to open the Network Connections window.
- Press Windows + R, type
- Locate the VPN Adapter:
- Identify the network adapter that the Shellfire VPN client uses. It is labeled wg-sfXYZ (or TAP-Windows Adapter V9 if you are using OpenVPN).
- Configure Sharing:
- Right-click the VPN adapter and select Properties.
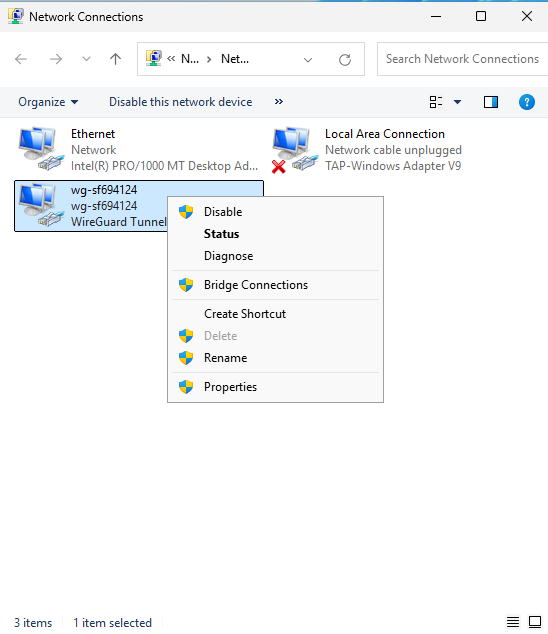
- Go to the Sharing tab.
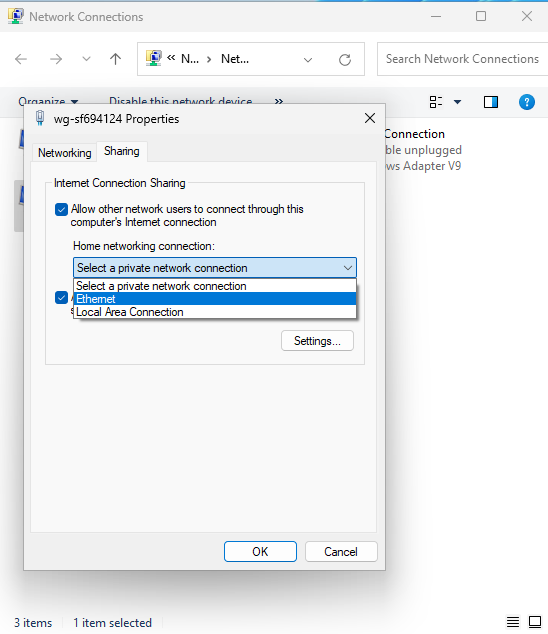
- Check Allow other network users to connect through this computer’s Internet connection.
- In the drop-down menu, select the network adapter that will provide the connection to your console (for example, your Ethernet adapter if you are using a wired connection, or your Wi-Fi adapter if you plan to create a hotspot).
- Click OK.
- Right-click the VPN adapter and select Properties.
3. Set Up a Shared Connection (Hotspot or Wired)
You have two main options for connecting your console:
Option A: Create a Wi-Fi Hotspot
- Using Windows Mobile Hotspot:
- Go to Settings > Network & Internet > Mobile Hotspot.
- Turn on Mobile Hotspot.
- Under “Share my Internet connection from,” select the adapter that is sharing the VPN connection.
- Configure the network name (SSID) and password.
- Save the settings.
- Connect Your Console:
- On your console, search for the Wi-Fi network you just created.
- Enter the password and connect.
Option B: Use a Wired Connection (recommended)
- Direct Ethernet Connection:
- Connect an Ethernet cable from your PC’s Ethernet port (the one set to share the VPN connection) directly to your console.
- On your console, ensure the network settings are configured for a wired connection.
4. Test Your Connection and Check NAT Type
- On Your Gaming Console:
- Navigate to your console’s network settings.
- Run the network connection test.
- Verify that your NAT type is now displayed as Type 2 (Moderate).
If everything is set up correctly, your console should now enjoy improved connectivity, with smoother multiplayer gaming and fewer issues with voice chat and game invites.
Troubleshooting Tips
Poor performance / high ping:
If you notice poor gaming performance, try selecting another Shellfire VPN server that is closer to your location or check for updates to the VPN client. Use a wired connection whenever possible. When using Wi-Fi, make sure you have good connectivity.ICS Configuration:
Double-check that Internet Connection Sharing is enabled on the correct adapter and that no conflicting network settings are active. If you have multiple network adapters, ensure the correct one is chosen in the sharing options.Firewall Settings:
Occasionally, local firewall settings on your PC may interfere with ICS. Temporarily disable the firewall (or create an exception) to test the connection.Console Settings:
Verify that your console is set to obtain an IP address automatically (DHCP) so that it correctly receives the shared VPN settings from your PC.
Conclusion
By following these steps, you can use your PC to relay a Shellfire VPN connection to your gaming console—effectively changing a restricted NAT Type 3 to a more gaming-friendly NAT Type 2. This setup is particularly useful in environments where your ISP’s network configuration prevents you from achieving an open connection. While using a VPN router is often simpler, this PC-based method offers flexibility for those who already have a robust Shellfire VPN setup on their computer.
Enjoy smoother online gameplay, improved connectivity, and the peace of mind that comes with bypassing ISP-imposed limitations—without extra costs.
Happy gaming!